How to Enable Catalog Mode in WooCommerce

Do you want to enable catalog mode in your WooCommerce store? In this guide, we will show you how to disable sales and turn your eCommerce shop into an online catalog step-by-step.

There are many marketing and business strategies that can help you grow your online store. Similarly, using a catalog mode can be beneficial in some situations, depending on the type of products you sell. Let’s better understand what catalog mode is and the main advantages it can create for your site.

What’s Catalog Mode?

A catalog mode site is an online store where customers can view the complete list of products but can’t buy them immediately.

In a traditional eCommerce website, visitors and customers can buy any product they like whenever they want. They simply add the product to their carts, go through the checkout process and pay for the products or services they want to purchase. In a catalog mode store, however, users can’t buy a product. These websites hide the “Add to Cart” buttons and disable access to cart and checkout pagesso that customers can’t purchase the products.

Does this mean that you can’t buy anything at all? No. Most stores only let registered users purchase or ask visitors to contact them through their website.

The catalog mode is widespread amongst wholesale and member-only eCommerce websites but it can also be very useful for other stores when they are pre-launching products or websites that just want to show their product stocks for marketing purposes.

Benefits of Catalog Mode in WooCommerce

The benefits that you get after you enable catalog mode in WooCommerce can be a real game-changer for some websites. Turning your store into a catalog and making users contact you to know more about your products can help you provide a more personalized experience. Additionally, it can also increase user engagement and help you upsell them.

Similarly, if you run a member-only eCommerce site, using catalog mode can encourage your audience to sign up as this is the only option they have if they want to buy your products. This way, you may get fewer customers but they will be people who are really interested in what you have to offer. On top of that, catalog mode might also be effective if you sell limited edition products on your site.

Lastly, catalog mode can also create hype if you are pre-launching a product or even a new online store. You can display the items on your site and use them to gain popularity before the store is live.

All in all, some of the general benefits of catalog mode are:

  • Display your products differently for different types of customers
  • Increase the number of registered users, which can be helpful for email and newsletter marketing
  • Provide users with a more personalized experience
  • Increase engagement with your customers and strengthen their trust and loyalty in your products
  • Disable certain types of users from buying your products
  • Create hype before launching a product

Now that we better understand the benefits, let’s see different ways to enable catalog mode in WooCommerce.

How to Enable Catalog Mode in WooCommerce

There are 2 ways to activate catalog mode in WooCommerce:

  1. Programmatically
  2. Using a Plugin

NOTE: We’ll assume that you are already using WooCommerce on your site. If that’s not your case, make sure that you install and properly set up WooCommerce on your store before continuing.

1. Enable Catalog Mode in WooCommerce Programmatically

Enabling catalog mode is very easy if you have some coding skills. The basic concept is to just hide the prices and Add to Cart button on your product pages. After that, your store will only work as a catalog.

Another approach is to hide the Add to Cart button but display the prices in catalog mode. There’s no right or wrong choice, so choose the approach that works best for you.

NOTE: This method requires editing some core files, so before you change anything, make sure you backup your website and create a child theme. The theme files have very delicate information and can break your site, so it’s always a good idea to have a way of going back in case anything goes wrong during the process.

Now, we’ll have a look at some snippets. All you need to do is add them to the functions.php tab. You can access it from your WordPress dashboard under Appearance > Theme Editor > Theme Functions. Keep in mind that the theme files may be different depending on the WordPress theme you use but you should be able to follow the guide without any issues.
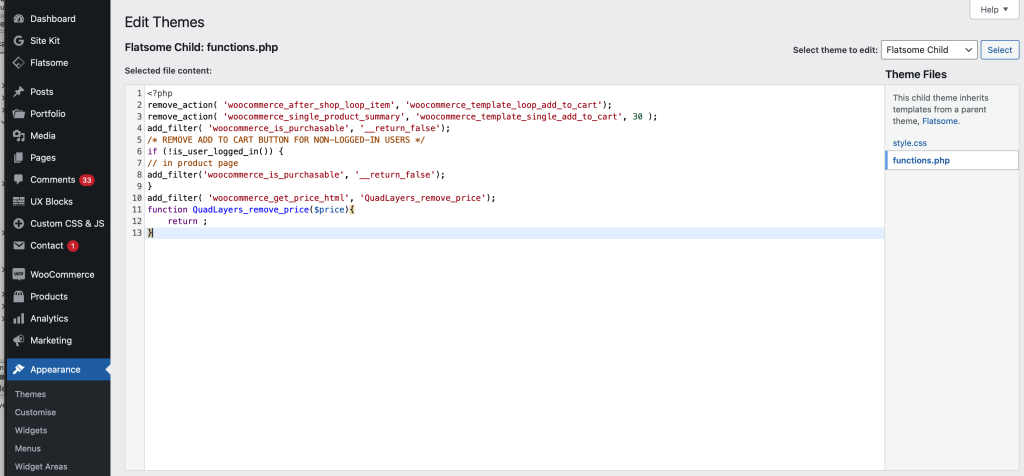
If you don’t have access to the theme files or don’t feel comfortable editing the files directly, you can add code to your theme or use dedicated plugins such as Code Snippets and Insert Headers and Footers.

1.1. Hide the “Add to Cart” Button

The first step to enable catalog mode in your WooCommerce store is to hide the “Add to Cart” buttons. To remove the button, simply use the following code snippet.

remove_action( 'woocommerce_after_shop_loop_item', 'woocommerce_template_loop_add_to_cart');
remove_action( 'woocommerce_single_product_summary', 'woocommerce_template_single_add_to_cart', 30 );

The first remove_action() will disable the “Add to Cart” button for the product page and the second function will do the same for the shop page.

You can also make the products unpurchasable and prevent customers from adding products to their carts. To do that, add the following snippet:

add_filter( 'woocommerce_is_purchasable', '__return_false');

This will also replace the “Add to Cart” with a “Read More” button.

Hide Add to Cart for non-registered users

Another interesting alternative is to hide the “Add to Cart” button just for non-logged-in users. This way, only users who are registered will be able to see the “Add to Cart” button and purchase products. For this, use the following code snippet:

/* REMOVE ADD TO CART BUTTON FOR NON-LOGGED-IN USERS */
if (!is_user_logged_in()) {
// in product page
add_filter('woocommerce_is_purchasable', '__return_false');
}

These are just a few examples but there’s a lot more you can do. For more information and options to hide the “Add to Cart” button, check out our guides:

1.2. Hide Prices in your Store

After hiding the “Add to Cart” button, your next step would be to remove the price to enable catalog mode in WooCommerce. Similar to what we did before with the buttons, the process of hiding prices with code is very easy and can be done in several ways.

If you want to hide all the prices in your store, you can use the following snippet:

add_filter( 'woocommerce_get_price_html', 'QuadLayers_remove_price');
function QuadLayers_remove_price($price){   
    return ;
}

But, if you want to display the prices for the admin and hide them from all the other website visitors, you can use the following snippet:

add_filter( 'woocommerce_get_price_html', 'QuadLayers_remove_price');
function QuadLayers_remove_price($price){  
if ( is_admin() ) return $price;
    return ;
}

Additionally, you can also hide the prices of the products only on the shop page using this script:

add_filter( 'woocommerce_after_shop_loop_item_title', 'remove_woocommerce_loop_price', 2 );
function remove_woocommerce_loop_price() {
  if( ! is_shop() ) return; // Hide prices only on shop page
remove_action( 'woocommerce_after_shop_loop_item_title', 'woocommerce_template_loop_price', 10 );
}

Furthermore, there are many other ways in which you can remove prices from your website. For more information, have a look at our tutorial on how to hide prices in WooCommerce.
How to Optimise WordPress

Is your WordPress markedly slow? Or have our Technical Support team informed you that your Managed or Self-Managed server is experiencing high load which has a negative impact on server performance? Has your site been moved to one of our quarantine servers due to load issues in order to ensure optimal server performance for our other customers?

Consider the aspects below to optimise the performance of your site or server.

There are various tools available for testing your website’s speed and performance, such as PageSpeed Insights (from Google) and Pingdom. Use these to determine which aspects of your site or server needs some fine tuning.

Here are some aspects to investigate:

1. Caching

In most cases, caching is the most effective way to speed up your WordPress website, by reducing unnecessary reloading of pages. Caching creates static HTML versions of each website page which reduces the number of database queries or execution of PHP code, reducing the number of server requests.

These are popular WordPress caching plugins (only use one):

2. Plugin cleanup

Too many plugins, or some specific plugins, can drastically impact your site’s performance. This can be caused by:

  • Additional HTTP requests. Some plugins add extra JavaScript and CSS file requests, causing higher server load.
  • Database-intensive queries. Inefficient or complex queries can cause significant load times and poor performance.
  • Plugin conflicts. Some plugins interact badly with other plugins or WordPress themes, causing performance issues.

WP Performance Profiling is one of many useful tools that highlight the effect that each plugin adds to your page loading time. Certain plugin types store more data than others in the database and can be the culprit that is placing high load on the CPU:

  • Antispam plugins e.g. Akismet
  • Backup plugins e.g. Backup Buddy
  • Link tracking plugins
  • Statistics plugins
  • Security plugins
  • Related Posts or Popular Post plugins

How to fix it:

Use systematic testing to isolate culprit plugins: deactivate them all and then reactivate one by one and run the test again. Note that even if deactivating a plugin improves performance, it may not be that specific plugin that is the culprit, but rather a conflict with another plugin.

3. Optimise the database

As your site grows, so will the database that runs it. Over time a lot of unnecessary data starts to bloat the database and maintenance is needed to keep it at an optimal performance level.

How to check it:

Query Monitor is a plugin which provides debugging and performance information on database queries, hooks, conditionals, HTTP requests, redirects and more. It highlights slow queries in red, which helps you to quickly identify problems.

If our Technical Support team inform you that it appears that high load issues are caused by database queries, then a debugging plugin like Query Monitor could help you to isolate the cause of the issue.

Factors that can unnecessarily increase the database size are

  • Certain types of plugins (see Plugin Cleanup above)
  • Spam comments
  • Revisions
  • Autosaves
  • Unused plugins and themes

How to fix it:

Plugins such as WP-optimize or Autoptimize or WP-sweep are great for cleaning up unnecessary data – but first create a complete WordPress backup of your site as changes made during cleanup are irreversible.

While the WordPress database is indexed by default, high server load is sometimes caused by poor database queries which may be resolved by additional indexing. There is no quick fix, though – the problem queries need to be addressed specifically.

However, what appears to be a database problem may not be; it may be a bad loop in a plugin that causes a good query to run too many times. Before trying further indexing, first do a plugin cleanup, and test plugins by deactivating them all and then reactivating one by one.

For further information: Finding and Fixing Slow WordPress Database Queries

4. Optimise images

Large, or poorly optimised images is a common reason for slow websites. They take up unnecessary space, add strain on the server and take a long time to load.

The aim with image optimisation is to find the best balance between image quality and file size: the file size of very high quality images is too large and causes slow loading, but fast loading small images may be of poor quality.

How to fix it:

  • Ensure the images are in the correct file format
    • Photographs or a complex images with lots of detail and colors should be JPEG.
    • Screenshots, illustrations, or images with lots of text are best as PNG.
    • For simple animation (but you don’t want to embed a video player), use GIF.
  • Crop the image to focus on what is important. This reduces file size.
  • Resize to a pixel width that is suitable for viewing e.g. 600pixels. Resizing should be done before uploading – although WordPress allows the option of displaying smaller versions, the full sized version is stored.
  • Compress images using tools such as WP Smush , TinyPNG or CompressPNG/JPG

5. Optimise Video

Use Lazy Load for Video to speed up your site by replacing embedded Youtube and Vimeo videos with a clickable preview image. By loading the videos only when the user clicks on the preview image, using jQuery, no unnecessary JavaScript is loaded.

6. Disable WP-cron

WordPress has a file called wp-cron.php that runs every time someone visits your site, which can severely throttle CPU usage and slow down busy sites.

Rather than letting wp-cron slow down your site, it should be disabled and let your system handle scheduled processes in the background — using a cronjob.

Disable wp-cron in WordPress

  1. Use FTP to access your server and navigate to the public_html folder
  2. Add this line at the bottom of your wp-config.php file

define(‘DISABLE_WP_CRON’, true);

Enable a real cronjob

You can now schedule these wp-crons to run once every couple of hours instead, using the Cronjob Manager in konsoleH. The rule you can add is as follows:/usr/bin/php-wrapper /usr/www/users/ftpuser/wp-cron.php


Important

If these solutions don’t resolve the high load or performance issues, then it is recommended that you get the services of a developer to help isolate and resolve the problem.

Once our Technical Support team contact you to advise you of load issues, the problem is already affecting your site or server performance and needs to be addressed with urgency. If your site is on one of our shared Web Hosting servers, your site may be moved to a temporary server to ensure that other sites are not negatively affected.

In the case of Managed Servers, although no other customers are directly affected, constant attention to load issues on your server affect the ability of our Sys Admin team to effectively monitor our entire network.

Our commitment is to alert you of load issues, providing an indication of what may be causing the high load, as well as snapshots of MySQL queries or logs. Note, though, that we don’t know the details of your site or server, and while we can offer suggestions, you will need to get the services of a developer if you aren’t able to resolve the issue yourself.

If the issue is not resolved after we alert you 3 times about incidents of high load, we will need to stop monitoring your Managed Dedicated Server until you inform us that the issue is finalised.

Case Study

Website: WordPress Site

WordPress Basics

Featured image size

A good starting point for your WordPress featured image size is 1200 x 628 pixels. These dimensions tend to work well across WordPress themes and page layouts, and also look good when shared on social media feeds

WordPress Featured Image Size
1200 x 628 pixels

A featured image visually represents a post or page on your WordPress website. Featured images usually appear on your website at the top of posts. They also appear when you share your posts outside of your WordPress site, like on social media or news websites. The purpose of the featured image is to draw readers to your content and signal what your posts are about and reinforce your site’s tone and branding.

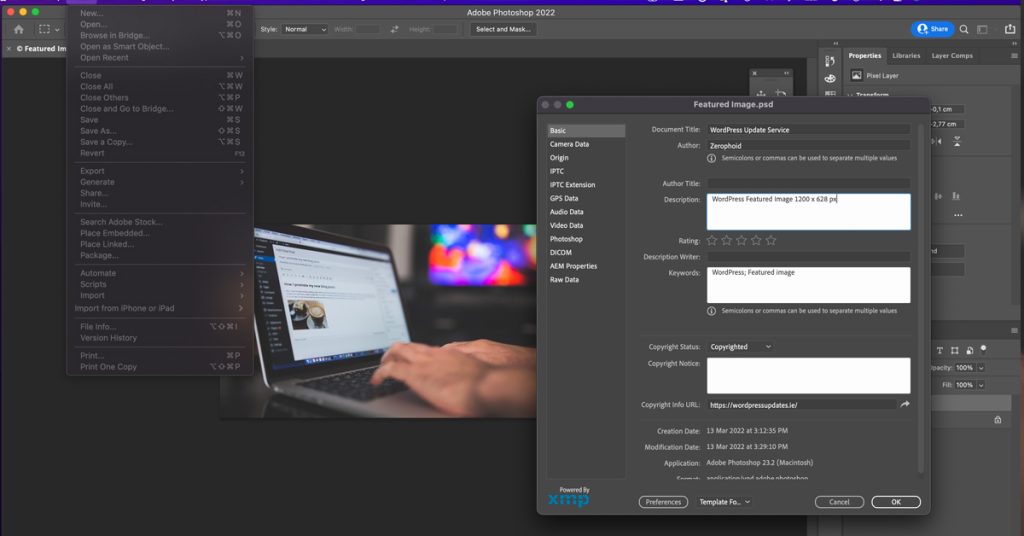
Metadata

Metadata isn’t important to the average person. This is despite the fact that the average person takes photos on their phone and uploads them online. The metadata on these photos contains the exact location the photo was taken. It’s a captured automatically and no one really thinks twice

image metadata
Protect your images

WooCommerce

Category image size

A minimum WooCommerce image size of 800 to 1000 pixels is recommended for standard products. If you have more complicated and detailed products, a larger image (e.g., 2000 pixels and above) will let customers zoom in to see the item’s details. So if you choose 800 then make it square 800px x 800px

Transferring Your Wix Domain Away from Wix

If you have purchased a domain from Wix, you can later transfer it to another domain host. 

To transfer your Wix domain away from Wix:

  1. Go to the Domains page.
  2. Click the Show More icon  next to the relevant domain and select Transfer Away from Wix.
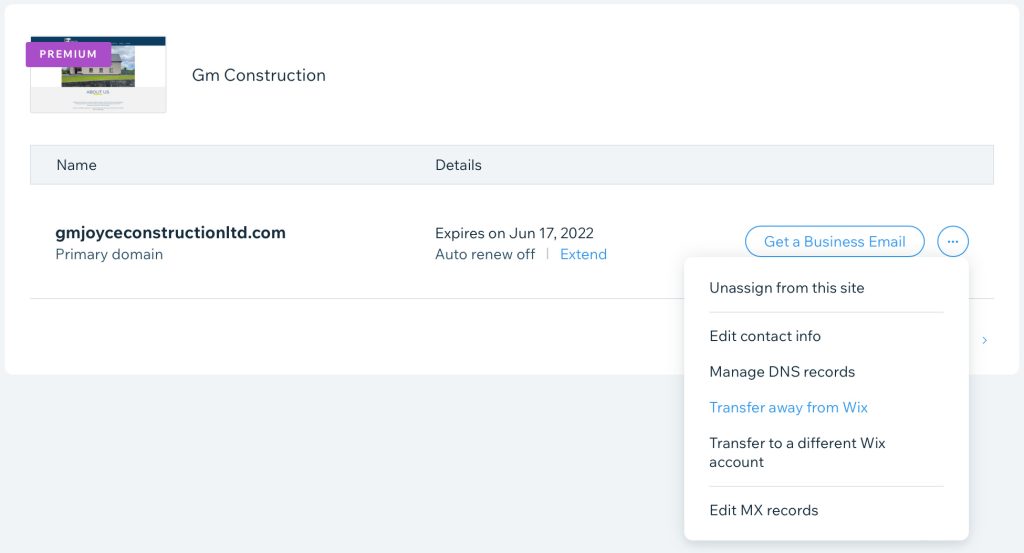
To transfer your Wix domain away from Wix
  1. Click Transfer Domain.
  2. Click I Still Want to Transfer

Next steps:

  • As soon as you click I Still Want to Transfer, we’ll send a transfer authorization code (EPP code) to your domain’s registrant contact email address
  • Once you get the code, follow the instructions from your new domain provider to transfer your domain. 
  • It can take up to 7 days for the transfer to complete.

In accordance with ICANN rules:

  • You cannot transfer a domain within 60 days of purchase.
  • Changing your registrant contact information locks your domain from transfer for 60 days.
  • Transferring your domain locks it from being able to transfer again for 60 days.