Do you want to enable catalog mode in your WooCommerce store? In this guide, we will show you how to disable sales and turn your eCommerce shop into an online catalog step-by-step.
There are many marketing and business strategies that can help you grow your online store. Similarly, using a catalog mode can be beneficial in some situations, depending on the type of products you sell. Let’s better understand what catalog mode is and the main advantages it can create for your site.
What’s Catalog Mode?
A catalog mode site is an online store where customers can view the complete list of products but can’t buy them immediately.
In a traditional eCommerce website, visitors and customers can buy any product they like whenever they want. They simply add the product to their carts, go through the checkout process and pay for the products or services they want to purchase. In a catalog mode store, however, users can’t buy a product. These websites hide the “Add to Cart” buttons and disable access to cart and checkout pagesso that customers can’t purchase the products.
Does this mean that you can’t buy anything at all? No. Most stores only let registered users purchase or ask visitors to contact them through their website.
The catalog mode is widespread amongst wholesale and member-only eCommerce websites but it can also be very useful for other stores when they are pre-launching products or websites that just want to show their product stocks for marketing purposes.
Benefits of Catalog Mode in WooCommerce
The benefits that you get after you enable catalog mode in WooCommerce can be a real game-changer for some websites. Turning your store into a catalog and making users contact you to know more about your products can help you provide a more personalized experience. Additionally, it can also increase user engagement and help you upsell them.
Similarly, if you run a member-only eCommerce site, using catalog mode can encourage your audience to sign up as this is the only option they have if they want to buy your products. This way, you may get fewer customers but they will be people who are really interested in what you have to offer. On top of that, catalog mode might also be effective if you sell limited edition products on your site.
Lastly, catalog mode can also create hype if you are pre-launching a product or even a new online store. You can display the items on your site and use them to gain popularity before the store is live.
All in all, some of the general benefits of catalog mode are:
- Display your products differently for different types of customers
- Increase the number of registered users, which can be helpful for email and newsletter marketing
- Provide users with a more personalized experience
- Increase engagement with your customers and strengthen their trust and loyalty in your products
- Disable certain types of users from buying your products
- Create hype before launching a product
Now that we better understand the benefits, let’s see different ways to enable catalog mode in WooCommerce.
How to Enable Catalog Mode in WooCommerce
There are 2 ways to activate catalog mode in WooCommerce:
- Programmatically
- Using a Plugin
NOTE: We’ll assume that you are already using WooCommerce on your site. If that’s not your case, make sure that you install and properly set up WooCommerce on your store before continuing.
1. Enable Catalog Mode in WooCommerce Programmatically
Enabling catalog mode is very easy if you have some coding skills. The basic concept is to just hide the prices and Add to Cart button on your product pages. After that, your store will only work as a catalog.
Another approach is to hide the Add to Cart button but display the prices in catalog mode. There’s no right or wrong choice, so choose the approach that works best for you.
NOTE: This method requires editing some core files, so before you change anything, make sure you backup your website and create a child theme. The theme files have very delicate information and can break your site, so it’s always a good idea to have a way of going back in case anything goes wrong during the process.
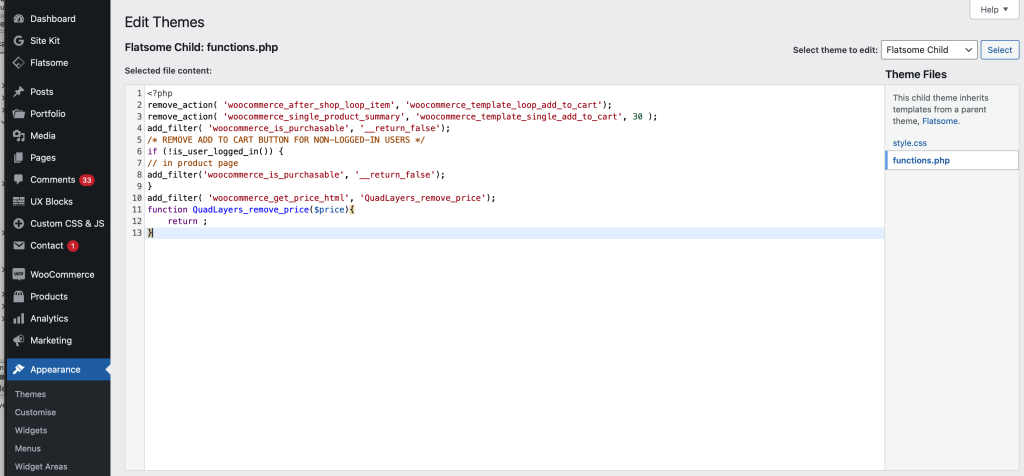
Now, we’ll have a look at some snippets. All you need to do is add them to the functions.php tab. You can access it from your WordPress dashboard under Appearance > Theme Editor > Theme Functions. Keep in mind that the theme files may be different depending on the WordPress theme you use but you should be able to follow the guide without any issues.

If you don’t have access to the theme files or don’t feel comfortable editing the files directly, you can add code to your theme or use dedicated plugins such as Code Snippets and Insert Headers and Footers.
1.1. Hide the “Add to Cart” Button
The first step to enable catalog mode in your WooCommerce store is to hide the “Add to Cart” buttons. To remove the button, simply use the following code snippet.
remove_action( 'woocommerce_after_shop_loop_item', 'woocommerce_template_loop_add_to_cart');
remove_action( 'woocommerce_single_product_summary', 'woocommerce_template_single_add_to_cart', 30 );
The first remove_action() will disable the “Add to Cart” button for the product page and the second function will do the same for the shop page.
You can also make the products unpurchasable and prevent customers from adding products to their carts. To do that, add the following snippet:
add_filter( 'woocommerce_is_purchasable', '__return_false');This will also replace the “Add to Cart” with a “Read More” button.
Hide Add to Cart for non-registered users
Another interesting alternative is to hide the “Add to Cart” button just for non-logged-in users. This way, only users who are registered will be able to see the “Add to Cart” button and purchase products. For this, use the following code snippet:
/* REMOVE ADD TO CART BUTTON FOR NON-LOGGED-IN USERS */
if (!is_user_logged_in()) {
// in product page
add_filter('woocommerce_is_purchasable', '__return_false');
}
These are just a few examples but there’s a lot more you can do. For more information and options to hide the “Add to Cart” button, check out our guides:
1.2. Hide Prices in your Store
After hiding the “Add to Cart” button, your next step would be to remove the price to enable catalog mode in WooCommerce. Similar to what we did before with the buttons, the process of hiding prices with code is very easy and can be done in several ways.
If you want to hide all the prices in your store, you can use the following snippet:
add_filter( 'woocommerce_get_price_html', 'QuadLayers_remove_price');
function QuadLayers_remove_price($price){
    return ;
}
But, if you want to display the prices for the admin and hide them from all the other website visitors, you can use the following snippet:
add_filter( 'woocommerce_get_price_html', 'QuadLayers_remove_price');
function QuadLayers_remove_price($price){
if ( is_admin() ) return $price;
    return ;
}
Additionally, you can also hide the prices of the products only on the shop page using this script:
add_filter( 'woocommerce_after_shop_loop_item_title', 'remove_woocommerce_loop_price', 2 );
function remove_woocommerce_loop_price() {
  if( ! is_shop() ) return; // Hide prices only on shop page
remove_action( 'woocommerce_after_shop_loop_item_title', 'woocommerce_template_loop_price', 10 );
}
Furthermore, there are many other ways in which you can remove prices from your website. For more information, have a look at our tutorial on how to hide prices in WooCommerce.


